expert grill instructions

Expert Grill Instructions Article Plan
The article provides a comprehensive guide to expert grill instructions, covering safety, assembly, maintenance, and troubleshooting. It includes model-specific manuals and key sections for optimal grilling experiences.
This guide provides expert grill instructions, covering essential tips and model-specific details for safe assembly, operation, and maintenance. It ensures optimal performance and enjoyable grilling experiences.
Overview of Expert Grill Instructions
Expert grill instructions are comprehensive guides designed to ensure safe and effective use of grills. These manuals cover assembly, operation, and maintenance, providing detailed steps for optimal performance. They include safety precautions, such as maintaining clearances to combustible materials and proper ignition processes. Instructions also address troubleshooting common issues and offer tips for achieving perfect grill marks. Model-specific guides, like those for the Expert Grill BG2824BP or GBC1703WB-U, ensure compatibility and clarity. By following these instructions, users can enhance their grilling experiences while minimizing risks. The manuals emphasize the importance of reading and adhering to all guidelines for proper assembly and safe use. This overview highlights the essential aspects of expert grill instructions, making them indispensable for both novice and experienced grillers.
Safety Precautions
Safety precautions are crucial for expert grill use. Maintain clearances to combustible materials, avoid flammable substances nearby, and never leave the grill unattended. Adhere to manual guidelines to prevent fires and ensure safe operation.
General Safety Guidelines for Grill Assembly and Use
General safety guidelines for expert grill assembly and use emphasize maintaining required clearances to combustible materials, as fires often result from ignoring these spaces. Never operate the grill within 10 feet of flammable substances or leave it unattended. Ensure proper assembly by following the manual carefully, and always supervise the grill during use. Keep children and pets away from the grilling area. Regularly inspect the grill for damage or wear, addressing issues promptly. Avoid using the grill in enclosed spaces or under flammable structures. Always follow the manufacturer’s instructions for gas and electrical components. Properly purge gas lines before lighting, and never store flammable liquids nearby. These precautions ensure a safe and enjoyable grilling experience. Adhering to these guidelines is essential for preventing accidents and maintaining appliance longevity.
Importance of Maintaining Clearances to Combustible Materials
Maintaining clearances to combustible materials is a critical safety measure when using an expert grill. Fires often result from failing to maintain required air spaces, as specified in the manual. Always ensure the grill is placed at least 10 feet away from flammable substances like wood, fabric, or overhanging branches. Never position the grill under combustible structures or in enclosed spaces. Proper clearance prevents accidental ignition of nearby materials. Regularly check the area around the grill to ensure no flammable items are within the unsafe zone. Supervision is essential to avoid potential hazards. This guideline applies to both gas and charcoal grills, as both produce heat that can ignite flammable materials. By adhering to clearance requirements, you protect your property and ensure a safe grilling experience.
Key Safety Instructions for Proper Appliance Use
Adhering to key safety instructions is essential for the proper and safe use of your expert grill. Always read the entire manual before assembly or operation. Never operate the grill unattended, as this can lead to accidents. Ensure the grill is placed on a stable, heat-resistant surface, away from children and pets. Wear protective gloves and eyewear when handling hot surfaces or flames. Avoid wearing loose clothing that could catch fire. Keep a fire extinguisher nearby and ensure it is easily accessible. Never use the grill indoors or in enclosed spaces, as this can lead to carbon monoxide buildup. Follow all manufacturer guidelines for ignition, temperature control, and fuel management. Properly purge gas lines before lighting to prevent gas buildup. Ensure all connections are secure to avoid leaks. These precautions ensure a safe and enjoyable grilling experience.
Assembly and Installation
Assembly requires essential tools like a screwdriver and wrench. Align parts carefully, ensuring proper fit and secure tightening. Double-check all connections for safety and stability.
Tools and Materials Needed for Grill Assembly
For successful grill assembly, you’ll need essential tools like a screwdriver, wrench, and Allen key. Additional materials include screws, bolts, and washers. Ensure all parts are included and undamaged before starting. Review the manual for specific hardware requirements to avoid delays. Proper tools ensure a secure and stable assembly, crucial for safety and functionality. Always refer to the provided instructions for exact specifications and quantities of materials needed. Organizing tools and parts beforehand streamlines the process and minimizes errors. If any items are missing or damaged, contact the manufacturer promptly. Adequate preparation ensures a smooth assembly experience and optimal grill performance.
Step-by-Step Assembly Guide for Expert Grills
Begin by unpacking and inventorying all components to ensure nothing is missing. Start with the base frame, attaching wheels and leg supports securely. Next, install the grill body, aligning it with the frame’s mounting holes. Use the provided hardware to fasten it tightly. Attach the handle and heat shield, ensuring they are properly aligned and secured. Install the burners and gas lines, checking for leaks. Connect the ignition system, ensuring all wires are securely attached. Finally, place the cooking grates and assemble any additional features like side burners or shelves. Tighten all hardware and double-check connections for safety. Follow the manual’s sequence to avoid mistakes and ensure a safe, functional grill setup. Proper assembly is crucial for optimal performance and longevity of your Expert Grill.
Attaching Grill Body, Handle, and Heat Shield
Begin by aligning the grill body with the base frame, ensuring the mounting holes match. Secure the body using the provided bolts, tightening them evenly. Next, attach the handle by screwing it into the designated holes on the grill body. Make sure it is tightly fastened for stability. Then, install the heat shield, positioning it above the burners to protect the grill from excessive heat. Use the supplied hardware to secure it firmly. Refer to the manual for model-specific instructions, as some grills may have additional components or slight variations. After attaching these parts, double-check all connections to ensure they are secure and properly aligned. This step is crucial for both functionality and safety, ensuring your Expert Grill operates efficiently and remains durable over time.
Final Assembly Checks and Hardware Tightening
After completing the assembly, perform a thorough inspection to ensure all components are securely attached. Check that the grill body, handle, and heat shield are properly aligned and fastened. Tighten all bolts and screws firmly, but avoid over-tightening, which could damage the hardware. Refer to the manual for specific torque requirements if applicable. Verify that the warming rack is correctly inserted and that all knobs and controls are functioning smoothly. Ensure the gas lines and connections are secure to prevent leaks. Double-check that all clearances to combustible materials are maintained as per safety guidelines. Finally, test the grill by lighting it briefly to ensure proper ignition and heat distribution. This final check ensures your Expert Grill is assembled correctly, operates safely, and is ready for use. Properly tightened hardware guarantees durability and optimal performance over time.
Ignition and Lighting Instructions
Ensure the grill is preheated and gas lines are secure. Follow manual ignition steps, light burners, and adjust for proper flame. Always ensure safe lighting procedures.
Preparing the Grill for First Use
Before using your Expert Grill for the first time, ensure all parts are properly assembled and tightened. Refer to the manual for specific assembly steps. Inspect the grill for any damage or missing components. Clean the grates and interior with a wire brush and mild soap to remove any manufacturing residue. Preheat the grill to a high temperature for 30 minutes to burn off any factory coatings. Allow it to cool before wiping down surfaces with oil to season them. Always follow safety guidelines, such as ensuring the grill is placed on a level surface and keeping it away from flammable materials. Proper preparation ensures optimal performance and longevity of your Expert Grill.
Lighting the Grill: Manual Ignition Process
To manually ignite your Expert Grill, start by ensuring the lid is open to prevent gas buildup. Turn the control knob to the “Light” position and press the igniter button. If the burner doesn’t light immediately, turn the knob to “Off” and wait a few minutes before retrying. For models without an igniter, use a long match or lighter, holding the flame near the burner ports while turning the knob to “Light.” Once lit, adjust the burners to your desired temperature. Always follow the manual instructions for specific models, such as the BG2824BP or GBC1703WB-U, to ensure safe ignition. Keep the grill away from flammable materials and never leave it unattended during the lighting process.
Troubleshooting Ignition Issues
If your Expert Grill fails to light, check the propane supply and ensure the tank is turned on. If using a manual ignition model, verify the burner ports are clear of debris. Clean the ports with a small brush or pin if clogged. For models with an igniter, press the igniter button repeatedly; if it doesn’t spark, try replacing the igniter battery. If the issue persists, ensure the grill is properly assembled and all connections are secure; Refer to your specific manual, such as the BG2824BP or GBC1703WB-U, for detailed troubleshooting steps. If the burner ignites but struggles to stay lit, check for blockages in the venturi tubes or spider guards. Always keep the lid open during ignition to prevent gas buildup and ensure safety.

Cooking Techniques
Master grilling with temperature control, direct and indirect methods, and tips for achieving perfect grill marks. Proper food placement ensures even cooking and prevents flare-ups.
Temperature Control for Optimal Grilling
Temperature control is essential for achieving perfectly cooked meals. Preheat your grill to the desired temperature, using the control knobs to adjust heat levels. For optimal grilling, maintain a consistent temperature between 225°F and 500°F, depending on the type of food. Use indirect heat for slower cooking and direct heat for searing. Always monitor the temperature gauge to avoid overheating, which can char food unevenly. For delicate foods like fish or vegetables, lower temperatures are recommended, while meats like steak and burgers benefit from higher heat. Ensure the grill is preheated for at least 10-15 minutes before cooking to evenly distribute heat. Proper temperature management ensures food is cooked thoroughly without overcooking, resulting in juicy and flavorful dishes every time.
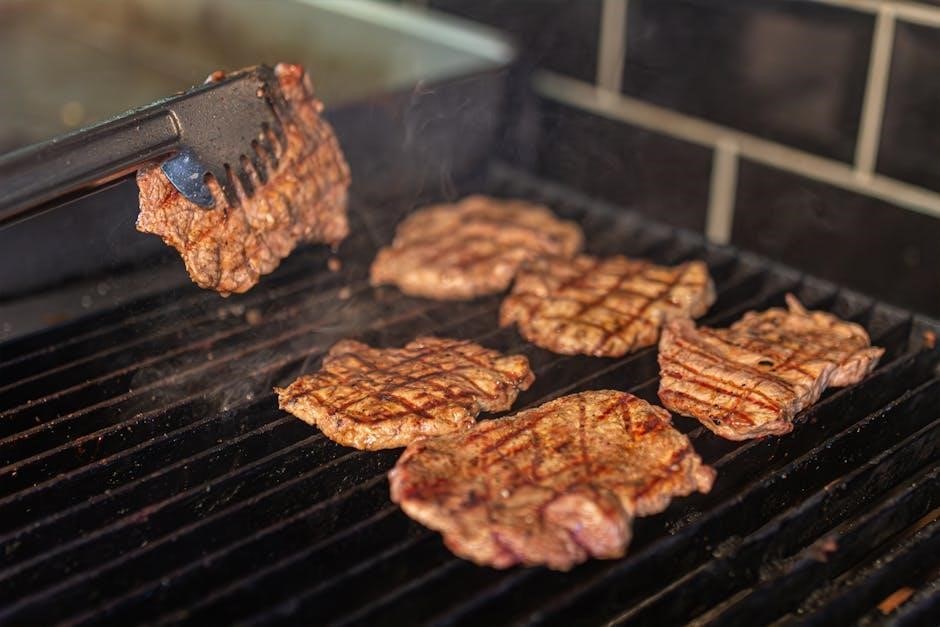
Direct vs. Indirect Grilling Methods
Understanding the differences between direct and indirect grilling is crucial for achieving desired results. Direct grilling involves placing food directly over the heat source, ideal for searing meats like steaks and burgers. It requires higher temperatures (350°F-500°F) and shorter cooking times, perfect for achieving crisp exteriors and grill marks. Indirect grilling, however, places food away from the heat, using the grill as an oven. This method is best for larger cuts like brisket or whole chickens, cooking at lower temperatures (225°F-300°F) for extended periods. Indirect grilling prevents burning and ensures even cooking. For delicate foods like fish or vegetables, indirect heat is recommended to avoid charring. Mastering both techniques allows for versatility and ensures perfectly cooked dishes tailored to specific ingredients.
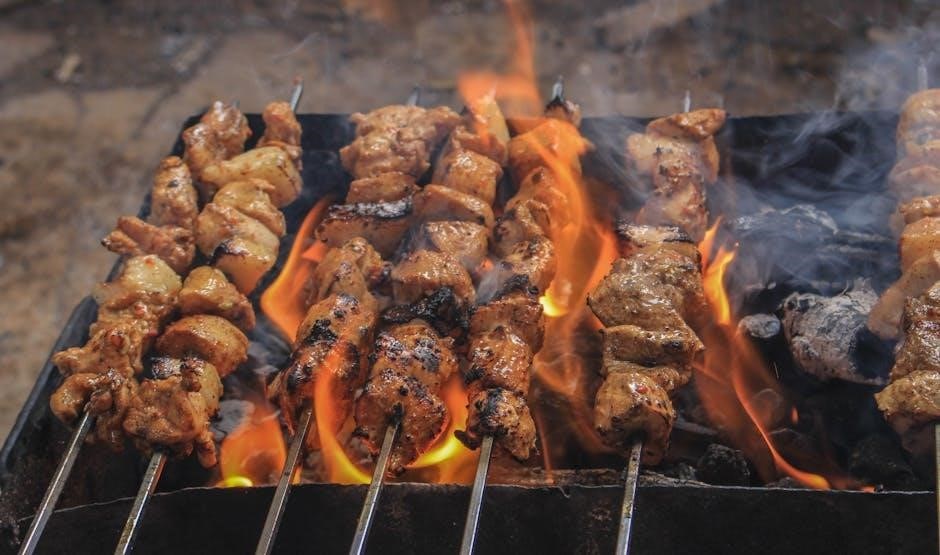
Achieving Perfect Grill Marks
Achieving perfect grill marks enhances both the appearance and flavor of your dishes. Preheat the grill to the optimal temperature for your food type, ensuring the grates are clean and brush them with oil to prevent sticking. Place food at a 45-degree angle to create diagonal marks. Sear for 2-3 minutes, then rotate 90 degrees to form a crisscross pattern. Avoid moving the food excessively, as this can disrupt the marks. Use a thermometer to monitor heat levels, ensuring even searing. For precise results, cook for 4-5 minutes per side for steaks and 3-4 minutes for burgers. Never press down on the food, as this can distort the marks and lose juices. Let the food rest briefly before serving to retain moisture and definition. Perfect grill marks require patience, proper technique, and attention to timing.
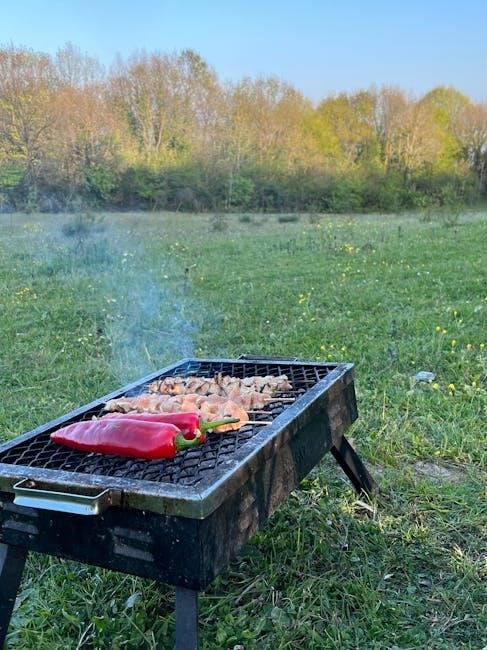
Food Handling and Placement Guidelines
Proper food handling and placement are essential for safe and effective grilling. Always ensure food is at room temperature before grilling to promote even cooking. Place food in the center of the grill for consistent heat distribution. Use tongs or spatulas to handle food, avoiding direct contact with flames. Pierce meats with a fork or knife sparingly to prevent juices from escaping. For delicate foods like fish, use a grill mat or foil to prevent sticking. Arrange food in a single layer to allow air circulation. Avoid overcrowding the grill, as this can lower temperatures and lead to undercooked areas. Flip food gently to maintain structure and achieve even searing. Keep raw and cooked foods separate to prevent cross-contamination. Adjust grill zones to accommodate different food types, using direct heat for searing and indirect heat for slower cooking. Always let food rest for a few minutes before serving to retain juices and ensure safety.

Maintenance and Upkeep
Regular cleaning, proper storage, and part replacements ensure longevity. Use grill covers and maintain clearances to combustible materials. Follow safety guidelines to prevent fires and damage.
Cleaning the Grill After Use

Cleaning the grill after each use is essential for maintaining its performance and longevity. Start by allowing the grill to cool slightly, then remove any food residue using a wire brush. For gas grills, turn the burners to high for 5-10 minutes to burn off excess food particles. Use a mild detergent and water to wipe down the exterior and interior surfaces. For tough stains, mix baking soda and water to create a paste, apply it to the affected areas, and let it sit before scrubbing. Regularly clean the grates with a grill brush or aluminum foil to prevent rust. After cleaning, dry the grill thoroughly to avoid moisture buildup. For charcoal grills, empty the ash pan and clean it with soap and water. Deep clean the grill at least once a month to ensure optimal function and safety.
Replacing Grill Parts and Accessories
Replacing grill parts and accessories is crucial for maintaining optimal performance and safety. Always turn off and disconnect the grill from its power source before starting any replacement. Identify worn or damaged components such as burners, heat shields, or grates by referring to your grill’s manual. Use the model number to purchase genuine replacement parts from authorized dealers or online retailers. For gas grills, ensure proper installation of new burners and ignition systems to avoid leaks or fire hazards. Regularly inspect and replace drip pans, flavorizer bars, and grill brushes to enhance cooking efficiency. Keep extra accessories like cooking grates and heat deflectors on hand for quick swaps. Follow the manufacturer’s instructions for installation to guarantee safety and warranty validity. Proper replacement and maintenance extend the grill’s lifespan and ensure reliable operation.
Winter Storage and Protection Tips
Proper winter storage is essential to protect your grill from damage and extend its lifespan. Before storing, clean the grill thoroughly, removing food residue and debris. Apply a rust-inhibiting oil to metal parts and cover the grill with a high-quality, waterproof cover. For gas grills, disconnect and store the propane tank in a well-ventilated, upright position away from flammable materials. Avoid storing the grill in damp or flood-prone areas, as moisture can cause rust. Keep the grill in a dry, protected location such as a garage or shed. Regularly inspect stored parts for signs of wear or pests. By following these steps, you ensure your grill remains in excellent condition and is ready for use when warmer weather returns. Proper storage safeguards your investment and guarantees optimal performance next grilling season.
Using Grill Covers for Extended Durability
Using a high-quality grill cover is essential for protecting your grill from environmental damage and extending its lifespan. A durable, waterproof cover shields the grill from rain, snow, and UV exposure, preventing rust and fading. When selecting a cover, ensure it is specifically designed for your grill model to guarantee a snug fit. Look for breathable materials to prevent moisture buildup, which can lead to mold or mildew. Regularly clean the grill before covering it to avoid trapping dirt and debris. Store the grill in a dry, protected area during harsh weather conditions for added protection. By investing in a quality cover and maintaining it properly, you can safeguard your grill from wear and tear, ensuring it remains in excellent condition for years of reliable use.
Troubleshooting Common Issues
Address common grill issues like ignition problems by checking gas flow and igniter function. Refer to error codes in the manual for specific solutions and guidance.
Identifying and Resolving Common Grill Problems

Common grill issues often stem from improper assembly, ignition malfunctions, or poor maintenance. Always consult the manual for model-specific troubleshooting steps. Ignition problems may arise from clogged burners, faulty igniters, or gas flow restrictions. Check for blockages in vents or hoses and ensure proper gas supply. If the grill doesn’t heat evenly, inspect burner holes for debris or damage. For error codes, refer to the manual’s troubleshooting section for solutions. Regularly cleaning the grill and replacing worn-out parts can prevent many issues. If problems persist, contact a professional for assistance. Proper maintenance and adherence to safety guidelines ensure optimal performance and longevity of your Expert Grill.
Understanding Error Codes and Solutions
Expert Grill error codes are designed to help users identify and resolve issues quickly. Common codes like E1, E2, and E3 often indicate problems with burner ignition, gas flow, or temperature sensors. If an error code appears, consult the manual for specific instructions. For example, E1 may signal a faulty igniter, while E2 could indicate a blocked burner or vent. Solutions typically involve cleaning the burner holes, checking gas connections, or replacing faulty components. Always refer to the manual for model-specific guidance. If issues persist, contact Expert Grill support for professional assistance. Regular maintenance, such as cleaning burners and ensuring proper ventilation, can prevent many error code occurrences. Keeping the manual handy ensures quick troubleshooting and minimizes downtime during grilling sessions.
When to Contact a Professional for Assistance
If you encounter complex issues with your Expert Grill that cannot be resolved through troubleshooting or basic maintenance, it is essential to contact a professional. This includes situations like persistent error codes, gas leaks, or significant damage to grill components. Always consult the user manual first for guidance, but if the problem remains unresolved, seek expert help to avoid safety risks. For instance, if error codes like E1 or E2 persist despite proper cleaning and maintenance, a professional can diagnose deeper issues. Additionally, if you are unsure about handling gas connections, ignition systems, or electrical components, professional assistance is recommended. Never attempt repairs beyond your expertise, as this could void warranties or compromise safety. Contacting a professional ensures your grill operates efficiently and safely, adhering to manufacturer guidelines and preventing potential hazards.
By following expert grill instructions, you ensure safe and efficient grilling. Proper assembly, maintenance, and troubleshooting practices will enhance your grilling experiences and extend the grill’s lifespan.

The expert grill instructions emphasize proper assembly, safety, and maintenance for optimal grilling. Always follow manufacturer guidelines for your specific model, ensuring all parts are securely tightened. Preheating the grill to the recommended temperature is crucial for even cooking. Use direct grilling for searing and indirect for slower cooking. Clean the grill after each use to prevent food residue buildup. Store the grill properly during winter, using a cover to protect it from the elements. Regularly check and replace worn-out parts to maintain performance. By adhering to these guidelines, you ensure a safe, efficient, and enjoyable grilling experience. Refer to your model-specific manual for detailed instructions tailored to your grill.
Final Tips for Safe and Effective Grilling
Always ensure the grill is placed on a stable, heat-resistant surface, maintaining required clearances to combustible materials. Never leave the grill unattended while in use. Keep children and pets at a safe distance. Use food-grade utensils and gloves to handle hot surfaces and food. Regularly clean burner ports and grease trays to prevent blockages and fires. Store propane tanks upright and in a well-ventilated area. After grilling, turn off the gas supply and allow the grill to cool before covering or storing it. Inspect hoses and connections for leaks or damage before each use. Follow the manufacturer’s guidelines for winter storage to protect your grill from harsh weather conditions. By adhering to these final tips, you ensure safe, efficient, and enjoyable grilling experiences year-round.